
Here are some of my favorite tools for hanging cabinets. These aren’t the best tools for the jobs, or at least they’re not exactly the tools I would generally recommend first. But, I like ’em and they provided a good experience.
Some of the tools are my warm favorites, such as the Hitachi 18V Triple Hammer impact driver, and others are my go-to’s because they’re reliable and consistent, such as the power tool accessories.
Advertisement
I chose these tools based on preference or convenience, rather than say the need to get more testing time in for a review.
After writing about my dream of a Lista workshop and oodles of cabinet space the other day, I mounted some wall cabinets that I had purchased earlier this month.
About the IKEA Sektion Cabinets

The cabinets are basic IKEA kitchen cabinets, 30″ long x 20″ tall x 15″ deep, and with two doors.
I have steel garage-style wall cabinets in another part of the basement, and will have to make some decisions in coming months as I strive to finalize the space for better work and storage organization.
IKEA’s Sektion kitchen cabinets, or at least these, are made in the USA, and the doors in Portugal.
Advertisement

The Blum door hinges were pretty sweet, and installed nearly tool-free. They install tool-free into the doors, and mounting brackets pop into adjustable hole slots in the frame before being screwed in. You’re not actually screwing the hinge mounting bracket to the cabinet, it mounts via a sort of expanding plastic anchor fastener.
I digress, but the point is these are some basic wall cabinets. It’s not like I installed a kitchen’s worth of cabinets.
Still, cabinets are cabinets, and they require tools to go up.
Here are the tools I used, and a couple of words about them:
Stanley FatMax Tape Measure

This was the first tape measure I found when I started collecting my tools and supplies. It’s not my favorite tape measure, but it was a good value when I bought it (buy two for the price of one). I had a defective one a long time ago, but this one has been a reliable companion.
I’m sure we’ll see more promo displays for the 2019 holiday shopping season.
RevMark Marker

RevMark Marker: I still have a couple of samples from my review two years ago. Honestly, I use RevMark, Sharpie, and Milwaukee Inkzall markers interchangeably, and most of the time they work equally well.
Stabila 48″ Level

I bought a Stabila 4pc level set a few months ago, and have been getting a feel for the levels. They’re… okay. These are value-priced basic levels either meant for homeowners/DIYers or as an inexpensive introduction to the brand. You can still buy this set at promo pricing.
The lighting in my basement is rather dim and directional, and it was hard to see the bubble when I used the level used to set the steel rail into position.
The way these cabinets can be hung, there’s a steel mounting rail that you cut to size and fastener to the wall. Then you also level the cabinets when screwing them together.
Buy Now(via Tool Nut)
Buy Now(via Acme Tools)
Hitachi 18V Triple Hammer Impact Driver

I really like my Hitachi/Metabo HPT triple hammer impact driver. It’s got oodles of power, adjustable torque and speed settings, and is really comfortable to use. After a couple of years, it’s still their premium brushless impact.
It’s premium-priced, but I snagged one for personal use during last year’s holiday shopping season. The deal last year was crazy – buy the impact for $139 and get a free (2) battery and charger starter kit.
There are more premium and more powerful brushless impacts, but I really like this one.
Milwaukee RedHelix Drill Bits

I hit wood studs in 4 spots but needed to secure the end of the steel mounting rail to the wall. I pulled a hollow wall anchor from a pack I bought last month, and needed to drill a 1/2″ hole.
So, I grabbed a pack of Red Helix bits from my stockpile (I resupply every holiday season and in between with promo sets). I used a 1/4″ bit and then a 1/2″ bit, but with the Hitachi impact.
I had a Dewalt 12V Max Xtreme SubCompact drill/driver on-hand that I intended to use, but my twist drills were in a different room and I was hesitant to use the 1/2″ bit in the small drill. I had no doubt the drill could do it, but it just seemed like an awkward combination.
These drill bits are fine for general purpose use. I still don’t like using impact drivers for drilling holes, but it was easier than going up to get a twist drill bit set.
Bosch T20 Impact Screwdriver Bit

I have a box of Bosch T20 screwdriver bits, but seem to have misplaced it. Can you see why I’m really trying to improve my storage and organizational situation? I have a couple of bit sets I bought on sale, and grabbed a T20 bit from there.
If you’re interested in trying these bits, the 24pc set is on sale for $10 again.
Dewalt Max Impact Phillips #2 Screwdriver Bit

Dewalt Max Impact are longer-sized impact-rated screwdriver bits that are said to last longer than FlexTorq bits. I bought some and are giving them a try. Dewalt Max Impact bits are exclusive to Home Depot.
I posted about these bits recently to Instagram:
Fasteners: Spax Screws and Strap Toggle Bolt Anchor

I love Spax screws. The choice was between Spax #10 2-1/2″ screws and GRK screws #8 2-1/2″. The Spax were a hair too wide for the metal rail mounting brackets, but they fit with only some leveling imperfections. #8 seemed a little too light so I went with the Spax #10.
IKEA recommends fasteners every 12″. I placed the cabinets to hit four studs and thought that was a better idea than spacing the fasteners closer together and secured to drywall. I used a strap toggle fastener at an end where the rail was too short to reach a fifth wall stud.
I don’t anticipate loading these cabinets too heavily, but if I do, I’ll a couple more wall anchors between stud locations. I have 4 direct-to-stud fastener locations and 1 wall anchor. The 12″ spacing they recommend would have resulted in 2 direct-to-stud fastener placements and 4 wall anchors.
The cabinets are at the foot of the basement stairs and will be for “quick access” tools and supplies.
Bessey GearKlamp Bar Clamps
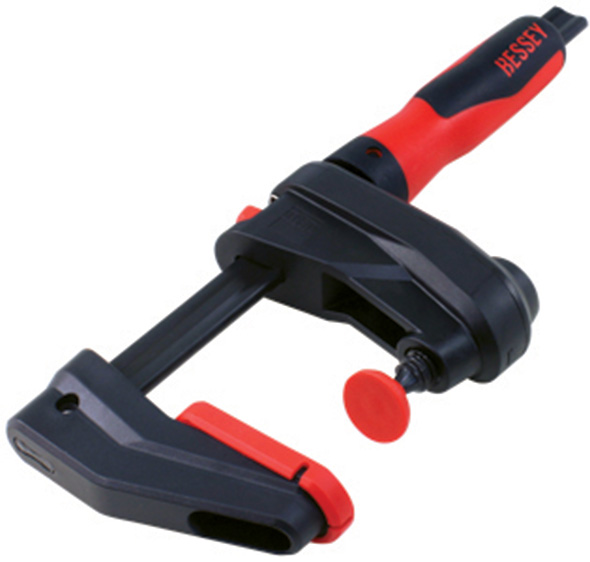
Dear Bessey, thank you so much for review samples of these GearKlamp bar clamps, I’m loving them so far!!
No, they’re not the end-all solution to all clamping needs, but they’re pretty swell. Yes, I just used the word swell.
We’ll talk more about these Bessey GearKlamps soon.
Wera Pozidriv Screwdriver

I did say that Wera Pozidriv screwdrivers are perfect for assembling Ikea furniture. I used this for assembling the cabinets and installing the hinge mounting brackets.
I also grabbed an unremarkable slotted screwdriver for the cabinet-to-rail connector.
Buy Wera 6pc Set via Amazon – this doesn’t have a Pozidriv driver, but has more commonly used Phillips and slotted sizes
Misused Tools
I needed a awl to start screw holes to fasten these cabinets together. I used a spare screw and hammered it in with the tape measure. Please don’t think less of me. I have two awls, one was upstairs, one was in the garage – I think. So I improvised.
Feedback?
What do you think about this kind of post, where I discuss which tools are in play for a given task or project and why those tools in particular?
I snapped the topmost photo after cleaning up and preparing to return the tools to their former storage spots, figuring it might be interesting for social media. But then this morning I thought – why not go into more detail in a ToolGuyd post?
Plus, maybe you have some questions about these particular tools?
It’s something different, and so I figured I’d ask for your opinions. Thank you, and happy Friday!
William
I like those clamps, would be very handy. Tempted to get a dedicated PZ screwdriver.
Stuart
Dedicated screwdrivers are always helpful. I use individual sizes, but other times I prefer ratcheting screwdrivers or multi-bit drivers. The Wera’s with “lasertip” anti-cam-out feature are great.
fred
Our installers really liked using an M12 (non impact) screwdriver with a Pozidriv bit.
That setup probably installed thousands of pieces of Blum and Grass hardware.
https://www.amazon.com/Milwaukee-Lithium-Ion-Cordless-Screwdriver-Tool-Only/dp/B00VYNEEZO/
Scott K
I like the post. It seems like it must be fun to choose which tools to use given your vast collection. No judgement on the improvised awl- sometimes the best tool is the one you have handy.
Stuart
That’s the thing, these weren’t conscious choices, they’re the tools I instinctively reached for.
Flotsam
Yes having a dedicated Pozidriv for putting together Ikea is a great idea. I also have some bits if i want to use it with my driver as well. Much more difficult to strip screws.
I too like the Fatmax tape measures, but wish they made it in a leverlock like the Stanleys. I also wish i could find the maker of a measure that was wide so it had a center scale that included the dimension of the tape measure housing. It makes inside measurements between two studs very, very simple. Saw that one in a youtube video.
schill
I think this is a good post and I would certainly read more like it.
I really like the Wera lasertip screwdrivers – although sometimes it seems like they do too good a job holding on to the screws. We have multiple Wera PZ drivers for times when my wife and I are simultaneously assembling IKEA furniture.
I also use Spax screws for just about everything that I can get the right size.
Thom
I have the Wera screwdivers but in red ( Advent calendar set) and they work well.
I also have the Milwaukee drill bit set and find they hold up well…buy them during holiday season at the Depot for best pricing!
Philip
Thanks–great to read a post about the project, the choices, the tools, and the process. Very thoughtful and instructive.
Philip
It is especially nice to read your thoughts about using the tools in daily situations–this adds nicely to the many other reviews that compare stats and pass along the manufacturers’ information.
MT_Noob
Can you do a post when you address the dim lighting?
I’m also setting up shop in my basement and I’m leaning toward some LED strips that are daisy-chain-able. However the options are overwhelming. I just want fairly bright, and more whitish than yellowish, easy to install lighting, and I don’t want it to break the bank. There are tons of super cheap ones on ebay/amazom, but I also want them to be safe and reliable (UL or other sort of rating). Am I asking for too much?
JR3 Home Performance
I got some home depot (commercial electric?) led light bars last black friday season. 3000 lumens, around 3500kelvin I think. $10 each when normally it’s about $20. Those have been good just wish they had a on/off rocker switch. illumination levels (lumens/sqft)for a basement can be tricky as you have lots of dark surfaces typically. it could range from 5-100lumens/sqft depending on needs and use. I have about 10 lumens/sqft but
I just use it for storage. If those lights go on sale again i may double or triple my lighting down there
ktash
I have three Fluorescent-type light fixtures with LED bulbs from Costco, aboutt $20 each, sometimes on sale. They say “shop light” and are made by Feit, if I remember right. I put them in my dimly lit basement shop, and it made a world of difference. They are plug-in and I had ceiling bulb lights with sockets, so it worked well. Since it’s all LED I’m not worried about overloading the circuit. I’d recommend them for price and convenience if you have a place to plug them in. The oldest is a few years old and still going strong.
JR3 Home Performance
I wouldn’t mind if you had multiple categories that could be subscribed to independently. Then in the email title specify the category. I love (and my wallet hates) to take advantage of flash sales so I’d check those right away but for other things I’d rather set aside and read through when I have downtime. A possible breakdown: flash sales, new tools, product usage update, product review, industry news, tutorial/showing off creative work
John Fal
Well I I’m intrigued with that hatachi triple hammer. The lowes Hitachi clearance event help put some nice new tools in my hand that I would of never invested in. Never thought about going to the dark green, already owning some lime green. I’m also very excited about their jump into multi volt. Knowing the 18v platform will be available for some time. I ended up getting their cordless framer, and I freaken love it. No kickback, just a smooth nailer, as quick as you can move it, with no hoses to drag around. I also invested in their deep cut brushless circular saw and brushless sawzall and they seem very well made. Can’t wait to see what else they may come out with being under the new owner. So far I’m very impressed. But I still love my 20/60v Dewalt and m12 Milwaukee best.
A W
I really like the red helix drill bits, and have used them in an impact driver on occasion.
I’ve also used the Bosch Daredevil spade bits, and really like using an impact driver for framing tasks where a bind up situation could cause injury. The impact driver is generally less precise (more wobbly), but there’s no chance of a kickback. So far I haven’t broken any bits.
It also helps to have a friend with a HoleHawg for the occasional project that really needs it.
Michael P
Hello, I don’t know if this is the best place to share this but I have just discovered that Milwaukee has a 3/8 SAE set bundled in a Packout case on the Home Depot website. It does not appear that there is ANY other information on it anywhere online and there is no listings for a metric one. I’ve been waiting for a set like this for a long time and was hoping you could reach out to someone and get some more information about it. Maybe Home Depot leaked a listing by accident or maybe it is a special. Can’t wait to hear what you learn.
Michael P
https://www.homedepot.com/p/Milwaukee-3-8-in-Drive-SAE-Ratchet-and-Socket-Mechanics-Tool-Set-with-Packout-Case-28-Piece-48-22-9481/309586202
ktash
I recently got a FastCap Upper Hand, for installing cabinets. https://www.amazon.com/s?k=FastCap+Upper+Hand+Work+Support%2C+Extends+from+28+in+to+60+in&i=tools&ref=nb_sb_noss_2 . It’s really great. My first use was to support a countertop while putting base cabinets under it. It is fabulous. Completely unlike the other jack type things I used in the past from Harbor Freight. You really need two, but I wanted to try it out. It’s really stable. I balanced some long wood I was cutting on the miter saw on it and it stayed really steady, so good for outfeed in a pinch.
I found this post to be interesting, just to see how you do things. Who among us hasn’t improvised and used a non-hammer tool to hammer something? Who hasn’t used a lesser tool, drill bit, etc. rather than go upstairs/inside/downstairs to the shop to get the good set?
Sam
I think posts like this are great, but I’m biased as I’m a cabinet maker and installer. If you’re gonna install for work , you definitely need the fast cap 3rd hands. I only use fatmax tapes , but I really wish they haven’t gone down in quality
Stuart
I have a pair of FastCap 3rd hands, but I bought them more for dust containment than cabinet support. I also have ZipPoles, but the FastCaps do come in handy for some support needs.
The What?
I don’t recall ever needing a clamp to hang cabinets. What is there to clamp to, the drywall? And you never ever use a marker on a finished surface or wooden surface. Especially cabinets. Worst suggestion. That’s a good way to get fired. I guess you’ve never heard of or used a carpenters pencil. It’s called carpenters pencil for a reason. And how are you supposed to know where to screw the cabinets to the wall without a studfinder so you can transfer the layout and mark(with a carpenters pencil) where the studs are located inside the cabinet? And you should only need one drill bit (3/16) to pre drill where the screws are going for your stud layout. It doesn’t matter what brand of bit you use either. Measure and space accordingly to the shelves on the layout running holes vertically on the back before it goes on the wall. Another must would be a laser line level or a chalk box if the cabinets don’t run all the way up to the ceiling. You have to have your 18 marked on every wall the cabinets are going on unless you’re running trim under the back face. You don’t need a level if you have a straight reference line. You’re not supposed to use bugle head screws either. Pan heads hold better. And you sure as hell shouldn’t use anchors for anything other than a medicine cabinet. And I’m sorry, but when you have a couple guys holding up a 100 lb cabinet trying to get it level nobody gives a fkn sht about favorite tools or any of that stuff. They want to get it on the wall as quickly as possible whether it be that ikea crap or cherry. I’ve never needed a stabila level or red helix bits or a $300 impact driver to hang cabinets in the past 20 years and I’d be lying if I said it’s a good idea to buy the most expensive tools you can in order to hang cabinets because they’re my favorite tools. Nonsense. Throw that marker in the trash and get a 15 cent carpenters pencil. Expensive high end tools doesn’t make a proper cabinet installation. And just because you have them means absolutely nothing. I’ve never had a homeowner ask me what brand of tools I’m using to install their kitchen cabinets. It’s knowing what the hell you’re doing. It’s a misnomer to think that expensive tools means that you know what you’re doing. Pretty obvious this was more about advertising than cabinet installation.
Stuart
Read the post. Clamps are to hold cabinets together.
If drywall, I would have used pencil. If/when the cabinets come down, alcohol will wipe the marker off the paneling. Or, at that time the paneling will likely come down.
I’m not suggesting anything, I’m describing what I used to hang my cabinets.
Carpenter pencil on dark brown wood paneling? are you joking?
PLUS, marker was used to mark hole locations and disappeared when I, you know, drilled the holes.
In this case I didn’t need a stud finder because I could see where finish nails were used to secure the wood paneling to the studs…
3/16″ is too wide for these screws. I like Spax because they self-tap and don’t require pilot holes except maybe for 1/4″ and larger lag screws.
I didn’t see a need for a line laser for two cabinets side by side on one wall.
No anchor? Sorry, with the end of the metal rail 8″ away from the stud, I felt better with one more fastener in there. It’s an extra ~70 lbs tension, >100 lbs shear support for piece of mind. Or should I have went with a smaller cabinet than I wanted or a longer rail that extends with an 8″ gap with no cabinets?
I’m not telling you or anyone how to hang kitchen cabinets, I’m discussing the process by which I completed as task for myself.
Your negativity about everything has gotten tiresome. Every new tool? “It sucks.” Anything different? “Useless gimmick.”
The Stabila levels were $79 for a 4-pack variety set, and I bought a Hitachi triple hammer last year for $139 (https://14cyiuhvcgv.com/hitachi-impact-driver-deal-122018/%3C/a%3E%29. Technically I didn’t, this one was a review sample, but that purchased triple hammer is going to a new home to “balance” things.
But sure, if it makes you feel better about yourself, you can think I buy the most expensive tools for the sake of it if you want to.
Vards Uzvards
Many good points (and I was curious about need for the pair of clamps too).
Stuart, you’ve got nice tools, no doubt. Triple-hammer impact driver might be an overkill though. And IKEA provides all the necessary tools, at very reasonable prices. These would probably be sufficient for the job at hand.
FIXA tape measure (imperial and metric graduations!)
https://www.ikea.com/us/en/p/fixa-tape-measure-40237557/
IKEA furniture has all metric measurements, AFAICT.
FIXA laser level
https://www.ikea.com/us/en/p/fixa-laser-level-90248450/
FIXA drill, with bits (I would guess, PZ2 bit is included too)
https://www.ikea.com/us/en/p/fixa-screwdriver-drill-lithium-ion-70232902/
FIXA hand tools (yet another PZ2 bit, likely)
https://www.ikea.com/us/en/p/fixa-17-piece-tool-kit-00169254/
FIXA screws-and-plugs set
https://www.ikea.com/us/en/p/fixa-260-piece-screw-and-plug-set-00169249/
Stuart
I guess they recommend clamps and fastening cabinets together because 1) it reduces the chance they will slide on the rail even though there are stops installed to the rear, and 2) they cabinet system has optional “cover panels” that might not react well to the cabinets shifting side to side.
Whether installing inexpensive cabinets from Ikea or working on precision equipment, or building a planter box, I’m going to draw from personal and sample tools I have on-hand. I’m not going to buy entry-level tools just to mount say $10 worth of clothing hooks to the wall. I do buy Ikea anchors on occasion in addition to other brands (I know they’re the right size and strength for say furniture tip-over prevention). But their other tools are meant for apartment dwellers and homeowners who need a one-stop shop for everything they need.
Ikea does not have all-metric measurements. e.g. a 30″ cabinet is 30″, not 76.2 cm.
I open the battery compartment of my kids’ toys with whatever is available, whether that’s a PB technician’s screwdriver, Wiha precision screwdrivers, or $2 4-in-1.
This post could have described 10 different combinations of tools used for the same task, and “The What?” would have found negativity and reasons to complain about each one.
Kevin
I have been watching (and helping a little) a cabinet installer. One of his most used ‘tools’ is a plywood box. He made it to the dimension he needs. Uppers are 18″ above a counter so one measurement is 18″. One is 19.5″ for installing uppers before counters. He sets the cabinets on top of the box to support them. Stacking boxes on end (I am not sure of the 3rd dimension) from the floor can hold a cabinet above a range or fridge. He also stands on them. For a narrow lower cabinet that was completely between studs anchors were used. I have used clamps to hold cabinets together and to hold a side panel in place while fastening. Spreader clamps can be used to support uppers. There are washers designed to increase the holding power of ‘bugle’ head screws that I have used. Everybody can learn something. The installer was using a #2 Philips to adjust hinges. I showed him my #2 pz screwdriver. He was going to pick up some pz bits at a trade show the next day.
Kevin M Smith
It’s amazing that every one of these “favorite” tools can be found on Amazon, with super handy affiliate links too! From the top picture, it also appears most of these “favorite” tools have never been used.
Sorry, this reeks of “I need to make a few bucks, better come up with a post real quick.”
Stuart
I hate to tell you, but you can buy nearly everything and anything on Amazon.
When I want to focus on story-telling, you’ll see more links to Amazon because it’s quicker and easier. To link to our other affiliate partners I have to login to different affiliate back-ends or connect to my server and start editing PHP code. Adding an Amazon link can be done in the post editor in seconds and with near-robotic speed.
It takes me a couple of seconds to add a quick purchase or price reference link, and a heck of a lot longer than that to answer “how much does it cost” and “where can I purchase it” questions and emails that always follow if there’s no purchase link.
I appreciate the healthy skepticism, but I don’t think I would do things differently.
Now, if you want to see what a “we want to make a few bucks, better come up with a quick post” post, I can certainly do that. Just say the word and I’ll add it to this week’s schedule. It’ll take me some time, as I’m not quite sure how to do this, but I’m sure I can think of something.
Kevin M Smith
No need to get defensive. This response more validates my points than discredits them.
I still read and mostly enjoy the site and articles you post. This one comes off as a money grab, that’s all. Nothing to be ashamed of, but don’t get defensive when people see through it.
I secretly wish I had a similar source of income that I could do the same thing, so perhaps I’m just jealous. 🙂
Stuart
Explaining myself isn’t defensive, or at least it’s not intended that way. Remember, I aim for transparency. Also, keep in mind that you’re not the only one reading my response.
When I say I appreciate your healthy skepticism, I mean it. There are way too many mindless “recommendations” out there these days, with a lot of articles and content deserving of “this is just a money-grab” criticism because they are. I strive for ToolGuyd to be different.