
We’ve talked a lot about T-track tables, clamps, and systems, which make it easy to create customizable and reconfigurable fixtures for clamping and assembly operations. The Woodpeckers X-Mat System takes things to a whole new level and improves upon some of the downsides of a T-track setup.
What makes the X-Mat System stand out is how it doesn’t need to take up any additional floor space in your shop. You can set it up on one of your existing tables when you need it, and take it apart to store away it when you don’t.
Advertisement
Like most project assembling systems, the X-Mat System has many separate parts and accessories that you need to buy before you can make a useful jig. The five components in the X-Mat system are the X-Mat, Secure Strips, Fingers, Anchors, and right angle L-Supports.
Woodpeckers X-Mats
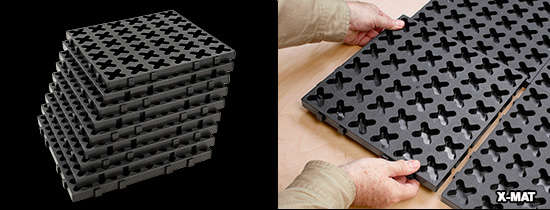
Each 12″ x12″ X-Mat has a grid of 6 x 6 X-shaped sockets that mate with Woodpeckers’ accessories. The sockets are spaced apart by 2″ (center to center) in horizontal and vertical directions.
The modular nature of the X-Mats is another advantage over the other fixed clamping tables, since the X-Mats can be connected together in different arrangements. For one project, you might need a 6′ by 1′ base, and for another you might need an “L” shaped base. A long as you have enough enough X-Mat squares and flat horizontal surface to support them with, the system is flexible enough to build into any size and shape.
X-Mat Secure Strips

You probably don’t always have to screw down your X-Mat squares, but for certain types of fixtures, you should. If you need to secure X-Mats into place, 2″ x 12″ Secure Strips connect onto the edges of X-Mats and provide three countersunk screw holes for fastening the combined panels to a work surface.
Advertisement
Although convenient, you might not need to buy any Secure Strips. They look like they are made out of the same 3/4″ resin material as the X-Mats, and the spacing of the “sockets” is the same. You could probably save some money by just drilling your own holes through the X-Mats. Drilling your own screw holes also means you can use your choice of fastener.
Fingers, Anchors, and Right Angle L-Supports
The Fingers, Anchors, and L-Supports are all accessories that plug into the X shaped “sockets” in the X-Mats.

Fingers raise your project off the work surface so you can finish all sides, just like Bench Cookie Cones, Mini Finishing points, or Painter’s Pyramids. The advantage of using these fingers with the X-Mats, compared to other systems, is that finishes and glues don’t stick to the X-Mats.

The X-Mat Anchor is a base that allows you to build your own fixtures to use with the X-Mats. It looks like you can use screws through the bottom to attach jigs to the top so the screws don’t get in the way. It also looks like there’s a recess for a nut or bolt in the bottom, but Woodpeckers doesn’t say what size it’ll accept. Maybe 1/4″ fasteners with 7/16″ hex size?

Anchors also serve as the base for Woodpeckers’ L-Support. The L-Support is a 3-1/2″ wide x 4″ tall right angle support that can be rotated in place and adjusted for length with up to 2″ of travel in any direction. If you need greater adjustment, simply move the L-Support forward or backward to another X-shaped socket.
L-Supports are made from glass-reinforced polycarbonate, which Woodpeckers says makes them indestructible.
Pricing
There are three different starter kits, priced from $60 to $150. There is a fourth kit for $290, but that kit also comes with a lot of Woodpeckers BC4-M2 Box Clamps, which aren’t technically part of the system, but can be used in conjunction with it.
Starter Kit 1 ($60)
(4) X-Mats and (4) L-Supports
Starter Kit 2 ($97)
(4) X-Mats, (4) L-Supports), (2) BC4-M2 Box Clamps
Deluxe Kit 1 ($150)
(9) X-Mats, (8) L-Supports, (6) Secure Strips, (4) Fingers
Deluxe Kit 2 ($290)
(9) X-Mats, (8) L-Supports, (6) Secure Strips, (4) Fingers, (8) BC4-M2 Box Clamps
A La Carte Pricing and Accessories
- 1 X-Mat: $11
- 1 X-Mat row add-on (3 mats plus 2 Secure Strips): $40
- 4 Anchors: $10
- 4 Fingers: $10
- 2 L-Supports (with Anchors, knobs, and hardware): $22
- 2 Secure Strips (screws included): $11
Most of the kits, components, and accessories are in stock, but some of the items have shipping dates of “after 6/12/15.”
James C
I really like the idea of this and the T-track systems. I guess I’d like to see these first hand before I can make any kind of decision.
Personally, I don’t mind the price if they can save time, money, and frustration. Buy it once and be done with it.
One possible annoyance with these is it looks like they could be real sawdust catchers.
fred
Carbide Processors carries these too and from time to time offers discounts.
Today they are having a 5% off sale (code Sale5)
http://www.carbideprocessors.com/woodpecker-tools/x-mat-system/
Stuart
When I last checked with then in late June, coupon code “smile” was good for 5%, and “tools7” was good for a 7% discount. I’m not sure if they’re still valid now.
They do have 5% discounts on occasion, and their staff is an absolutely pleasure to work with.
ktash
I’ve looked at these off and on, but my concern is whether they can apply strong clamping pressure. I do own a couple of the box clamps, intended to help with making drawers, boxes with or without my pockethole jig. The problem is that they don’t really clamp strongly especially for the pockethole jig, they just make things square. Maybe I just haven’t figured out how to use them successfully.
Woodpeckers makes excellent tools, generally out of my price range, though.
Benjamen
I was wondering about the clamping pressure myself, especially if you don’t use the box clamps, all the pressure is going to be on the bottom the the joint and weaken as you get toward the top. That is unless you are clamping narrow boards.
I’ve had to think about this for a while, but I think the key is in the “Assembly” part. Rather than think about this system for clamping parts think about it holding parts in place for repeatable assemblies. Say you had a bunch of the same boxes to make you set up the X-Mats to hold the pieces in the proper position while you apply bar clamps to provide the actual clamping force. Then you pull the box out, put in new pieces and repeat.