Dropping small parts or fasteners on the floor can be a huge time waster, as it often means you’re in for some crawling and squinting – unless you get lucky and find the part right away. The other day Ben posted about 2 floor and tabletop work mats, and asked if anyone knew of a better floor solution.
Putting down dampening mats or flooring can help minimize the amount of travel a small part can achieve, but even then most of us cannot line every workbench and every floor surface.
So what do you do after your part or fastener drops, bounces, and escapes your sight?
Advertisement
If I cannot immediately spot the part I dropped, I find a flashlight and get down to the floor.
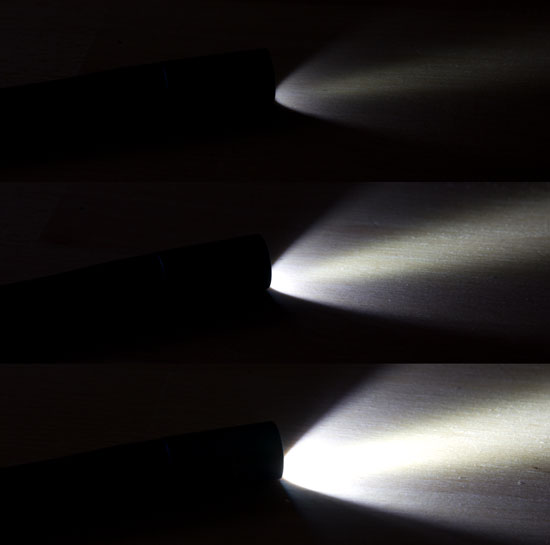
Step 1: Find an aimable light source, such as a flashlight.
Step 2: Turn on the flashlight and place it on the floor such that the beam lights it up horizontally.
Step 3: Either rotate or scan the floor with the flashlight until you find the part. Pretend you’re a lighthouse.
I’m not sure if this trick has an official name, but it can be described as side lighting. If you’ve had some experience with microscopy, you could get away with calling it dark field illumination. Sounds fancy shmancy, doesn’t it?
Side lighting and dark field illumination is what happens when you shine a light transverse across a surface so as to highlight the texture and elevational features.
Advertisement
You kind of want the light pattern to look like this:
But don’t worry about turning off the light, unless of course you’re working with a really, really weak flashlight that is overpowered by the ambient room lighting. This image wasn’t taken for this post, it was part of my FourSevens Preon 2 LED flashlight review. (That’s still a fantastic penlight, by the way.)
This works much of the time, but not always, and it typically works a lot better on smooth hard surfaces. You could sometimes use it on more challenging floor surfaces, such as carpeting, with some success, depending on the height of the pile and size of the part.
I’m decided not to include any helpful images here. I hope you don’t mind, but I have a good reason for this. Your homework, yes I’m giving you homework, is to place a small object – a screw, grain of rice, or whatever – on the floor. Take a flashlight and light it up from the side. Maybe enlist a helper and ask them to place it somewhere on the floor while you close your eyes. Can you find it with your flashlight?
This technique really needs to be attempted at least once to be effective. That way it’ll sink in and be available when you need it. I don’t want to show you how it works, I want you to try the trick and show it for yourself.
And if all this sounds a little Captain Obvious to you, then you have a different homework assignment. Pass the technique on to a friend or family member that might not know about it. Very many people are in the dark (do you see what I did there?) about this rather helpful side-lighting technique for finding small stuff on the floor.
Warning: You might want to have a vacuum cleaner, broom, or mop at the ready. Shining a flashlight across a floor will show you how filthy and disgusting it is.
fred
The same technique (or trick if you like) can be used to find imperfections in walls, ceilings etc. when plastering, patching, sanding etc. Paint stores/departments often carry the low-tech light bulb reflectors which can be used for this purpose:
http://www.amazon.com/Woods-0151-8-5-Inch-Reflector-150-Watt/dp/B000HHQ94C/
Robert
In the photographic world, this is referred to as “texture lighting.” It’s something that you’d typically avoid for portraiture, because it shows details that aren’t always the definition of flattering.
It’s very common however with some product photography for the purpose of showing fine detail or texture. It’s especially effective with harsh “point light sources” such as the previously mentioned flashlight.
The bottom line is to get the light at a hard right 90 degree angle to the subject relative to your eyes; (lens.) The further you move the light source away from your eyes, (lens,) the more directional it becomes relative to the eye. The more directional is becomes, with all other variables being the same, the more texture you see. In other words, it becomes more dimensional and can be viewed in greater detail.
Kevin
Same technique; different terms. In woodworking, this is referred to as ‘raking light’ and there are light arrays that are sold to allow someone to find all the scratches and swirl marks in wood prior to finishing. It’s always interesting to see all the irregularities that appear on what looks to the naked eye to be a smooth, well-sanded panel.
K
ktash
Yea, I was thinking “raking light.” Very important to keep checking your work as you “sand the grits” progressively (60-80-100-120-150+).
TIP: If you are getting a lot of imperfections after sanding with a random orbit sander, there are two things you can do to change it. First, move the sander at about an inch per second. Because of the nature of the sander it will cause these perfections if you go faster than this. It will seem slow, but actually will sand much faster than if you move it quickly like a hand sanding block. Of course, with a belt sander you don’t go this slow, either or you will take off too much material.
Second when you change grits make sure to wipe or vacuum the surface clean. Otherwise you will be making imperfections by that 60 grit piece stuck under your 150 grit paper.
One of my favorite subjects, if not my favorite task in woodworking 🙂
SteveR
I came across this technique by accident years ago and, I’ve no doubt, by many others. I was new to wearing contact lenses at the time, and having a lot of trouble trying to put them in. I dropped them a lot, or they popped out afterward, so it became a neat trick to find them on the carpeting in my apartment. Mine were hard contacts then; I eventually gave them up owing to the frustrations of putting them in, the resultant blurry vision owing to low humidity and the cleaning regimen. And, yes, you’re right about how dirty a floor can be.
Incidentally, people should NOT wear contacts while mixing concrete. Dry cement dust can fly up and get between your eye and the contact; owing to the alkaline pH of the cement, it will lay there and burn your eye(s). If you think you’ve gotten some in your eyes, immediately go to an eyewash station and flush them with cool water for several minutes.
ktash
Thanks for the tip. I use a raking light for sanding but never thought about it as a way to find lost bits.
jack brown
Great tip. My technique has always been to put my head on the floor, eye at floor level, and rotate my body and head until I spotted the damn thing sticking up. This seems much more efficient.
steve
Your next task is to find a #0000 brass cell phone screw on shag carpeting.
Mrs. ToolGuyd
This might do the trick: http://www.instructables.com/id/25-Unique-Uses-for-Pantyhose/step4/Vacuum-Find-Lost-Objects/
Grady
Learned of this technique about 30 years ago. About six month later my wife lost one of her contact lens on the carpet. I turned off the lights and used a flashlight in a horizontal sweeping motion. The contact lens immediately lit up like like a light house. Call it whatever you like, this technique WORKS. And has worked for me many times since.
BikerDad
Of course, if your floor is ankle deep in plane shavings, this trick may not be successful….
Nathan
lol – when I drop stuff in shavings or wood dust piles – I suck it up with the vac – then I sieve the dust bin out when I dump it.
I made a sieve for the shop vac with expanded metal grate – and screen mesh from a busted window.
Pete
Been doing this for years. The wife hates it lol, with a high powered light it shows all the drirt and dog hair on the tile lol
JoeM
So THAT’S what it’s called! Thanks to all of you who put names to it! I’m genuinely relieved it has a name, and I’m not going crazy!
I use this technique for more than one of my skills. Building things, I use it when I drop tiny objects. Screws, bolts, tiny clips, you name it. Putting a light on the ground and sweeping it back and forth creates a shadow that matches the object I’m looking for. Also, I sometimes make Silver and Crystal Jewellery. And sometimes my hand slips off the tools, and I drop tiny, tiny shiny things on the ground, and they’re not always visible to me. Shining the light on the ground makes them twinkle brightly, and I can see them to pick them up.
Thanks guys! Now I know to call this “Raking Light” instead of “That Flashlight Thingy…”
Andrew
I definitely use that method anytime something falls under the table or desk.
A secondary method if you’ve dropped something with magnetic material is to sweep a magnet around the search area.
SteveR
One thing I’ve done on occasion is to take an Ullman or similar magnetic pick-up tool to use on metallic objects that have fallen to the floor. I’ve used this both in the house and out in the yard. A few years ago I dropped some small screws from a large outdoor sun umbrella in the grass and didn’t discover this fact until later. I didn’t know where to look exactly, but I extended the 16-lb. lift strength tool it’s full length (34″), sweeping the area I had traveled until I found all of the errant screws.
Nathan
love my pet magnet for metal stuffs (2 older speaker mags off a set of busted 6×9’s I had back in early college) on a bar with a stick. (yes you can buy mag sweeps now from the likes of harbor freight for like 20 – but that’s no fun)
raking light – never heard that makes great sense. thank you.
thought – purposely mounting some lights under say your workbench or ? – for this.
tajparis
I learned this trick years ago as an aircraft mechanic in the Air Force.
Ed SKi
Knew this tip for years! Dropped many of #00 screws (Mac Tech) on a “horrible color” floor. Not all screws like magnetized bits…
Chris Ellerby
This is also a great way to realize how filthy your workspace floor is. It’s a great motivator to sweep up the shop after you find your dropped treasure.
I drop thing a lot. My telescopic magnet is probably the most used tool in my shop when I’m working with nuts/bolts/screws. And when the magnet fails, I use this lighting technique.
Justin
That is genius