
So… I’ve got 3 holes in the kitchen ceiling, around 5/8″ wide.
What would you do and use for a seamless repair and finish?
I have ideas on what to do for most of these repairs, but it’s be interesting to hear how your experiences would lead you to tackle them.
Advertisement
I picked up some 3M patch + primer compound and self-adhesive aluminum mesh patching compound, which I think could do the trick. I also have a small tub of joint compound and thin fiberglass mesh tape in case it works out better, and because there are other things that need fixing.
So what do you think? Tape or patch + spackle? The 3M patch + primer seems appealing, and they claim that it won’t shrink but dries fast.
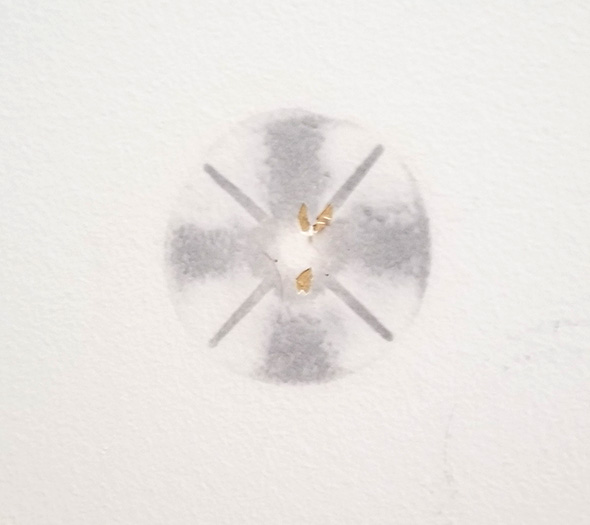
Next up, this is what happened when I used special non-marring pads between my spring-loaded photo poles and the painted ceiling. Weird, right? I’m guessing maybe… I don’t know. It’s a weird stain. I’m thinking some kind of chemical reaction.
There are a few other spots where there are light stains, this one was more pronounced, and the paint stuck to the white non-marring pad and looks to have taken a piece of the drywall paper with it.
A tiny bit of spackle or joint compound, plus primer, plus a fresh coat of paint?
Suggestions?
Advertisement

We had the kitchen renovated 2 years ago. This is what happened on the living room side of things. There are 3 marks like this. Nail pop-outs?
There are 2 marks like this in my son’s room too, also in the corner, possible when the siding was repaired last year.
So… knock it flat, sand and spackle? I’m clueless on this one.

There’s just this one spot. Scrape, spackle, sand, and repaint? Nobody will ever notice this, but I’m worried one of my kids will investigate and make things a whole lot worse.
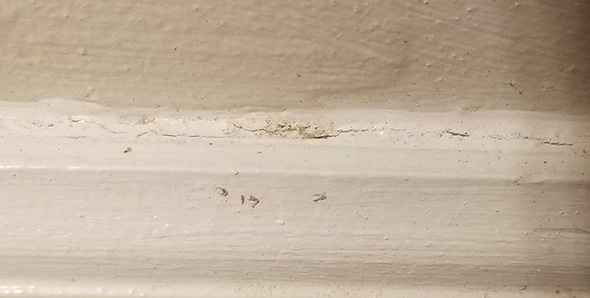
The baseboard caulk right near the air vent was all dried out and cracked during the winter. What’s a good way to repair this so it’s not as unsightly next winter when it dries out again?
Scrape, recaulk with something that shrinks less, and then touch up the paint?

This is what happens when a door is removed, and the new frame doesn’t quite reach where the old one did. The paint is peeling, and gap between frame and wall (to the left) is maybe an inch wide.
It bugs me, but I don’t think there’s anything that can realistically be done about this.

The fireplace stone juts into the garage. There are some gaps where the drywall and mud just couldn’t get into, here and around the corner.
If it’s just a cosmetic thing, I’m leaving it as-is.

I don’t know what happened here. It’s the hallway wall, between kitchen and living room.
There are bubbles (bottom left), and raised parts (left and right). Did they rush-spackle and also paint over tape from when there was a temporary dust barrier put up?
I have no idea what I’d do here. This is too big of a repair for me to want to attempt anytime soon, but maybe I can tackle it in small steps every time I have to patch, repair, or paint somewhere else in the house.
Nils
People get mystified by drywall but it’s really not bad.
In general taped fixes are stronger. Look into the fibafuse patches.
Caulk doesn’t work well for voids.
Long cracks along changes in plane or material 3/8 or larger I would cut wood or drywall to fill. (Eg alongside your door)
So with those principles, knock out any areas where you have loose material (like your bulges) and fill. If it’s bigger than 1/2” diameter it will be faster to use compound/sparkle in conjunction with a patch of some kind.
You can also use setting type compound fo deeper cracked areas.
And again any seams along side change in material or plane i would use compound/sparkle/full to get within the 3/8 size and caulk to finish (since these types of joints are subject to movement and can break free purely compound-based fills)
For your wavy wall you probably have flexing or movement or possibly a bad install. You should make sure it’s solid and then skim coat to hide.
At the end of the patching process you will want to sand/wet sponge it back to flat before painting.
Stuart
Thanks!
I’ve found that textbook repairs are easy. Thinking on your feet kind? It gets intimidating for me. I notice everything, and can spot all of the not-so-smooth repairs that the previous owners did.
For the bulges, do you mean knock it flat with a mallet and wood block, or excavate to remove the bulging material and then fill?
Between the door frame and wall, that’s not a crack, it’s a transition between painted wall and a section previously considered by the old and seemingly larger door frame. I’d have to cut or scrape the peeling paint back a little, and then I have no idea what to do from there. The only reason I’d cut or scrape the paint back is to prevent it from eventually chipping or falling away. It’s one of those areas that probably won’t bother anyone, but I hate knowing about.
Cookie Monster
I wouldn’t use spackle even if it says it has a primer in it, it actually tends to flash. For such small repairs I, myself would use 5 minute mud possibly on all of that stuff but it sets up fast definitely if it’s hot where you’re working. For stains use a stain blocking primer like kilz for example even if you do 2 or 3 coats then paint. Bare drywall/mud needs to be primered too, which regular primer is usually used because of cost, but stain blocking primer can be used as well as flat paint works as a primer.
As for your question, all the loose material should be scraped or cut out completely, then filled back in with drywall and/or mud then caulked as needed. Basic tips, most people just have to learn how to do these repairs with hands on experience and tips along the way.
Nils
Putty knife screwdriver to chip out loose stuff in the bulge and fill. Those in particular probably don’t need tape.
The crack by your door- sounds like you mean a prehung door that was close but not exact was stuffed into that opening. That’s fine; you still want to fill (or cover) that gap using wood. The goal is to camouflage it so your eye doesn’t notice the difference as compared to the other side of the door. Obviously the best thing would be pull off all the trim from that face and put larger pieces such that that gap is covered.
Stuart
Thanks!
That’s not a crack, that’s a… paint disruption?
The old door and frame was removed, new metal fire-rated pre-hung door was installed. But there’s peeled paint edge and what looks to be unpainted section in there. I don’t even know how to describe it.
Pulling all the trim to cover that area up, or repair it, sounds like a chore.
Maybe I can get away with lightly scraping the loose paint, taping the sides of the gap, and reaching in with a paint brush? It’s one of those things that’ll likely bug me when I’m done with everything else that needs more immediate attention.
Nils
Ok that door- I’m seeing that there’s a black line that I assume runs floor to header which is actually a thin cavity between the rough opening and the door frame that extends the depth of the wall.
I’m confused because if that’s the case I wouldn’t want to just paint it.
Stuart
It’s kind of ugly, but sealed. I’ll try to take better photos another time.
Jonathan
@Stuart,
Some call this “gourmet spackle compound” but it can be used on wood or drywall.
MH Ready Patch
The former owner of our house had a penchant for ceiling hooks; two teenage boys that took their frustrations out on the wood core hollow doors (circa 60’s) and a Rotie that like teething on wood items that had any overhang. Used it on drywall joints that cracked after house has settle over past 50 years (w/o mesh or tape).
Drys rock hard won’t crack or shrink, sands like wood, drys quickly, and can be used interior/exterior.
Filled our 5/8 ceiling hook holes , no backer or screen.
Zinsser 1 qt. Ready Patch Spackling and Patching Compound under $9
https://www.homedepot.com/p/Zinsser-1-qt-Ready-Patch-Spackling-and-Patching-Compound-04424/100398387
Stuart
Thanks!
It’s on my shopping list!
JoeM
If my own history with drywall is any indication, I would fix it wrongly. Drywall paste, tape, putty knife, oscillating tool to sand smooth… In theory, I know what I’m doing, and it’s super easy to repair. I still have the confidence to do it, but it always looks awful when I’m done, no matter what method I use.
In general though, I’d fill the holes with drywall paste, let it dry, then sand it smooth with my oscillating tool. Little paint over top, done. I’ve heard some of my friends use masking tape, or even taped up gauze strips when working on holes in a ceiling this way, to hold the putty in place while it dries.
ALWAYS looks ugly when I do it. Most of the rest of you could probably do this and make it invisible, but for reasons unknown to me, this always turns out LAUGHABLY bad for me.
Adabhael
Small bugles make me think of little angels at reveille.
“Small bulges and cracked paint” as well as the picture of “Peeling Paint by Baseboard” makes me worry about lead paint getting exposed and crumbling to dust, or getting pealed off by curious little fingers and eaten. Based on the molding profiles and the thickness of paint, I am guessing the house is older than the 1978 ban. This is not my area of expertise, but I would read up (e.g. the EPA) and do a test so you can make a plan to do the work safely and to leave it safely encapsulated.
In my experience, wavy and bubbled finishes are often evidence of water in the wrong places, in any phase, or even changing phase (and building science is my area of expertise). I would look hard for the causes of those problems before affecting a repair. I have no affiliation, but BSC has a lot of accessible resources about how things can go wrong, and how to fix or avoid problems, if you are of a mind.
Stuart
Ha! *Fixed*, thanks!
The house is pre-lead-ban. I’ve been told by local contractors that lead paint wasn’t used in this area. I haven’t done testing (yet), but I treat everything as if it is a concern.
This area doesn’t see foot traffic, as it’s behind the couch, but I still want to be very proactive about fixing it ASAP.
Other areas, such as the kitchen ceiling, has newly installed drywall with a single coat of paint, so I’m not worried.
fred
My advice is to take it slow. The big mistake that lots of DIY folks make is to try to do all the patching in one application. Small thin coats – with progressively larger broad knives and feathered edges will look better. Under a really harsh raking light you will see imperfections to knock down between coats. For small holes overhead use fast setting compound – or even plaster of paris. A little old plaster ground up in the new will accelerate the setting. Shellac based primer should seal in that stain – once you’ve done some scraping and spackling. Some new drywall screws alongside popped nailheads should be able to pull your wallboard back into place. Using caulking to cover up a sloppy trim job doesn’t speak well of the carpenters – but scraping, sanding and repainting should make it look better. If your house was built before 1978 – you should make sure that there is no lead paint on that baseboard.
migmiker
I learned a lot from watching YouTube videos. I would recommend you look at The Drywall Doctor, he does it for living, and he makes me look good at doing drywall.
https://www.youtube.com/channel/UCHZ1ELrSnYrnw5ujBZZbhog
Justin
I’ve fixed a lot of small ceiling holes (1″ or less) with a couple of just-add-water supplies called Durabond and Easysand. They come in different numbers, and the numbers are supposed to mean how much working time you have in minutes. 45 is probably the most common, but the smaller the number the faster the stuff dries and you can move on to the next step. Just lookup a youtube video about how to mix the stuff, it’ll take some trial and error but you’ll get it. Just remember you want it thicker if you are doing ceiling work or else it’ll be on your face.
If its actually a hole (vs a gouge), you need to fill it with durabond. It dries really hard and is made to fill in gaps and holes in drywall. Be sure to push it into the hole so it dries concave, not convex. Durabond does not sand well. Once it dries, go over it with the Easysand and feather it out. Once that dries, you can sand it flat/flush and if you didn’t feather it enough, or it didn’t quite fill the hole you can just do another coat.
I’m sure plenty of people would want to put tape (mesh or paper, a whole separate debate) over the holes, but the problem there is the more height you add the more you have to feather out the difference so it looks and feels smooth. This means bigger patches, and more to paint later. If you are installing a small piece of drywall, you have to use tape. If the old tape bubbled/cracked and you removed it all, you should use tape. Scratches, gouges, small holes, and nail pops? Don’t waste your time.
Also, anything pre-mixed will take ages to dry once you put it up. if you are trying to fill a hole or gouge with it, it’ll move and settle all over the place and you’ll be sanding away a ton of it.
Extra notes:
Anything loose should be removed. As someone else said, you should probably test it for lead first. Take your flat 4″ drywall knife and keep running over the cracks and peelings until everything is solid. You’ll be amazed how far it goes out before its done. If you don’t do it, it’ll just peel off later underneath your nice new work.
Drywall mud is for filling in drywall to drywall connections. Anything else should be caulk of some kind of trim. I’ve seen it used to fill in gaps between drywall and wood or brick, but it generally doesn’t last long in that application.
Caulk shrinks and cracks eventually. That is why so many of them are rated in years. You just have to remove it and re-apply. Depending on how bad it is, you may just want to “upgrade” the trim to something taller and caulk that in where the wall is smoother.
The bubbles, if solid and not squishy, is just someone painting over crappy drywall work. It either wasn’t sanded, or the person just couldn’t get it to look any better and just painted it. Not too much you can do about it outside of add drywall mud and try to float everything smooth. It’ll be a lot easy to just put up some paneling and call it a “feature.”
fred
The reason we liked plaster of paris for ceiling holes is that as you push it up and into the hole -it mushrooms out above the ceiling board and locks itself into place – much like it would when plastering on top of wood lath. Maybe you can do the same with Durabond 20 – but you can mix plaster and get in to set in under 10 minutes using the hot water and ground-up old plaster as accelerators.
BTW – when we had a lot of drywall to do – we always subbed out the taping work to guys who did only that. They came in with stilts on and got at it – much faster and better than our carpenters. On the really big (high rise jobs) the tapers sometimes would be pumping the mud and using automated tapers
Stuart
Thanks!
Will look into Durabond. I’m guessing 1 application for it to fill the ~5/8″ holes, since it sets instead of drying?
Michaelhammer
Drywall ceiling holes: cut a piece of foam board I saw that you have to fill the holes. Should be just below the surface. Hit it with fast and final spackle. Allow to dry and sand and apply two coats of ceiling paint.
Wired stain from photo equipment: apply two coats of white pigmented shellac . Hit with fast and final spackle. Allow to dry, sand and apply two coats of ceiling paint.
If the small bulge is caused by a screw pop, remove the offending screw and put it back in a little above or below the hole. Remove all the loose plaster. Mix up some easy sand 20 and fill both holes even with the plaster. Allow to dry and apply a thin coat over both holes with a 6” knife. Allow to dry and sand smooth. Apply two coats of paint. It in unnecessary to prime joint compound.
Peeling paint by baseboard: I am RRP certified for lead removal. Wear rubber gloves. While using a vacuum supplied with a hepa filter, use a five -n-one or putty knife to remove all loose debris. Vacuum every bit up. Clean the entire area with a Swiffer. Place the pad in a zip lock bag and throw in the trash. When you empty the vac, do it outside into a heavy duty trash bag, twist the end into a goose neck and duct tape it. It is now ready to put out with your household trash. Use easy sand 20 to patch the wall, allow to dry and sand smooth. Apply one coat of wall paint. Allow to dry and caulk the baseboard. Apply a second coat of wall paint. Allow to dry and apply one coat of trim paint to affected area of baseboard.
Cracked baseboard paint: see above. Be sure to use a fifty-year caulk such as Phenoseal. You’re unlikely to have to deal with it again.
Garage man door: that’s a shame. What you have there, sir, is a poor installation. Crying shame to see such a thing. The proper procedure is to remove the door and start over from the inside, not the outside, an all too common mistake among carpenters. If you wish, I’ll tell you how to take care of that. Probably you’re looking to fix as is. Use an old blade in your multi tool cut out the offending area so that it is rectangular with square corners. Measure the depth to be filled, likely about 3/4”. Cut wall board to fit the area (two pieces of 3/8” if 3/4). Apply 2” mesh joint tape to all the seams. Apply and sand a coat of easy sand 20 three times. Apply two coats of paint.
Fireplace: quick, easy aesthetic fix. Jab your 5-in-1 parallel to the ceiling at the offensive plaster and clean it all out. Home Depot sells mortar repair in a caulk tube. https://www.homedepot.com/p/Quikrete-10-oz-Mortar-Repair-Tube-862009/100318502 Apply a bead across the top.
Wavy bubbled paint: bummer, bad mud job. Scrape the bubbles and fill with easy sand 20. Sand and skim the whole thing with a 12” knife using easy sand 90. Sand between coats. Hint, when you think you’re almost there after sanding, prime the area. Now you can easily assess and fix the imperfections.
Good news, once you have all your materials, these can all be banged out in one weekend.
Stuart
Thanks!
I picked up a tub of Patch and Repair compound – maybe it’ll work in place of Easy Sand?
https://www.usg.com/content/usgcom/en/products-solutions/products/wall-prep/patch-and-repair/usg-sheetrock-dust-control-patch-and-repair-compound.html
With the garage entry door install, there is not going to be any way to get in there easily to cut out the offensive section. The entire gap is 1-1/16″ wide.
I also have exposed drywall paper in the garage, but that’s because I had a hellish time installing cabinets, and their corners gouged in a little bit. That stuff I’m not worried about.
With the wavy multi-error section, I’ll likely save that for when it’s time to repaint. Still, good advice, thanks!
Thanks also for the Phenoseal and Easy Sand recommendations!
It’s one thing to patch holes in various apartments, but a different intimidating story when it’s the kitchen I (and my wife) have to look at everyday.
I’ve seen soooo many bad patch and repair jobs, and I figured it’d give me some relief and a head-start to get tips and recommendations from you guys. So thank you everyone!
I figure I’ll do things slow, a little bit each morning.
Michaelhammer
I’m not familiar with that USG drywall compound. As a side note after reading other comments, be aware that the premixed products fisheye like crazy and require extensive sanding.
Don’t be concerned about patching the kitchen ceiling, those holes are particularly easy. I picked up the foam plug idea from the blown in cellular guys. Their nozzle is about 1 1/2” and they carried a big bag of foam plugs that they popped into every stud bay. Then they hit it with the fast and final. I followed with a sanding sponge, some had to be feathered out a little more with the same product. Works well. Now I make my own plugs 1/16” larger than the diameter of the hole from foam insulation board. If you can get a taper on it, all the better.
Nathan L
I’m not at all an expert on mudding but i maintain a really abused commercial space (part of it is used for an escape room business and the would-be escapists are not at all gentle) and so i fix a lot of damaged walls. Fortunately i did the partitioning of the space and used thicker drywall and some extra reinforcing with metal studs for commercial building code compliance and sturdiness, but the existing walls are a mess.
For small holes through a single piece of drywall (as opposed to in a seam) too big to just swipe in bit of spackle, i would use some mud-coated and folded or crumpled paper joint tape or even just some other porous but strong paper and mud to form a composite fill. Taping over and then mudding small holes is a pain to completely hide (because of the bulge) and it doesn’t need structural reinforcement anyway. The first application is just enough mud to get the paper glued into the hole, and then successive layers of mud until flush, with time to set up between each (this is a lot easier to do if you’re mudding other areas so you don’t have to mix up a tiny batch over and over). Use 20 minute mud to reduce your delay.
For the partial stain partial paper delamination type of damage (pulling things off the wall stuck on with two-sided tape does that a lot) the easiest solution is carefully sanding the high areas and then skim-coating. I have mixed success with that, depending on the amount of damage to the drywall paper. A bigger, feathered layer of mud would make it less obvious, it just depends how much effort you want to put into it and how good you are at feathering.
It’s hard to tell how big that crack is. If the layer of compound there is thick enough to sand down and mud it flat without messing with the drywall then that’s what i’d do. It’s probably best to break out the compound around the crack to make sure nothing loose is left before you mud it.
If the drywall is protruding beyond the layer of the surface you can use a hole-saw to remove the broken and offending part and then patch and mud.
If the resulting hole is too big for a makeshift composite patch like described above (mud+paper) to stay in place, but still not big enough to compromise the strength of the wall assembly or likely to take a lot of abuse, i sometimes use a splinter of furring (or bit of steel stud if that’s your poison) to bridge the hole and brace against the back of the drywall on each side, and then attach a small piece of drywall cut to fit the hole with a drywall screw and mud it as usual. You can put a screw into the bridge through the intact drywall on either or both sides to increase the rigidity.
Anything more serious than that and i’ve found it’s best to cut it out the whole mess as far as halfway across the nearest stud on each side and use a piece of drywall cut to fit, and proceed as normal.
I don’t know about your house but when peeling paint looks like that here, it’s often because there’s termite damage underneath, or dry rot, or both. If everything underneath is good, a lot of paint is still going to have to come off to make sure you repaint on a solid base. A good primer first is important because the earlier paint layers under the peeling layers were probably oil-based.
Any gaps between drywall and other materials need a bead of caulk to help prevent the thermal expansion mismatch from causing cracking. But i’m sure Stuart knows that.
Final general comment: a properly built stud and drywall system forms an effective fire barrier (gypsum actually releases water as it is scorched by fire) and strong structure (properly attached drywall panels give rigidity to the stud wall, and are in turn given support with a small amount of flexibility to withstand impacts and temperature fluctuations). Any time the damage to the wall compromises this assembly it’s important to consider whether the intended fix is going to restore it. Gaps are particularly problematic as they provide a route for fire to bypass the barrier entirely.
. Any time there’s damage that reduces the t with the mud are
Raoul
Couldn’t you put some trim over that fireplace/drywall joint? Crown molding?
I think Durabond will work good on your ceiling holes and it might dimple so be prepared to skim over it.
A neat trick I learned years ago was a blow out patch. Plenty of vids on youtube. Sooner or later you will probably find a use for it.
Stuart
In a garage?
I have a large patch job I need to do at some point too – my daughter’s closet has a small safe-sized cutout in the wall.
Raoul
Definitely the garage. Aside from the bedroom I spend most of time in the garage. My garage is more like a man cave workshop.
A blow out patch should work for a safe but you still might need some furring strips to back it. Another trick I learned with blow out patches is if your wall has regular drywall, you could spend a little extra time cutting the paper on the wall so the paper on the patch fits into it. It actually saves a lot of time and mess because you don’t have to use extra mud to feather it out.
KeithInKC
However you fix the holes and patch the areas, the sanding is what makes it look good. Use some high quality lighting from the side to spot imperfections and then after you prime it, look again. Nailing the sanding means nailing the finish.
Mike Muir
Hire a professional drywall contractor that has mastered patches. Drywall is NOT an easy task to take on, it actually requires skill to float your patches correctly, and the end result should be with minimal sanding. Texture is a whole different ball game, and the metal mesh patch kits will create a huge hump on the ceiling where the hole once was that’ll need to be floated out anywhere from 12-24″ wide depending on the patch…if you want a seamless patch.
YouTube videos, and online advice will only get you so far, but for the drywall issues you presented here might need a little more experience and advice.
Trust me, I do nothing but fix other people’s drywall mistakes everyday…
Best of luck with your project.
ToolOfTheTrade
Make a hotpatch and lightly mud the edges to feather out the paper but make sure that you lightly skim around the holes first so the paper will stick. Use 20 minute for your skim and second coat and lightweight mud on the last coat. Do not try to run a thick coat of mud on your first pass. Especially with 20 minute. It’ll look like shit and you’ll be sanding more than necessary. The idea is to hide the paper and feather the mud into your finished ceiling. When it dries, knock down the high spots and lightly sand your skim coat. Then run another coat. Repeat. Run your lightweight and then sand and paint. It is absolutely unnecessary to try to cut out a square and put pieces of wood on the edges. And you definitely don’t have to cut a square to the closest ceiling joist and cut a piece of drywall to size. There’s no need to tape & mud a ⅝ diameter hole. Just cut an inch square and put your hotpatch in and feather it out. You don’t want to just put a piece of tape over the hole and mud that either. It will crack.
ToolOfTheTrade
And I don’t mean that patch bullshit made by 3m. I’m talking about cutting out a hotpatch from a piece of drywall. The only things you should need are drywall,20 minute and lightweight mud, mudpan, and knives. It’s pretty damn simple and easy and there’s nothing difficult about it.
B D
If I understand you correctly this is what I would do as well or similar enough. I make a hole a square; example 2 ” x 2 “. I cut a square piece of drywall 3″ x 3″. I remove 1 ” of drywall material around the parimeter of the patch leaving 1″ of loose paper on all sides of the patch . This patch gets gently press fit into the hole and the paper gets mudded in acts as the tape. Easy, invisible repair. I was taught to call them blowout patches, not hot patches. I supose that is like calling a can of soda a can of pop. Probably depends where you live.
Mario
First quickset 5 minutes does dry fast but works like a charm . The pics I see seem to be all easy fix’s I would just call a professional and he/she could be done in a couple of half days because the texture will have to dry before painting:
Josh
For walls, I just hang a picture in front of holes. It seems to do the trick really well. For everything else, I find that if I ignore it long enough, I will totally forget about it.
Pete
Do you wear corrective lenses for nearsightedness? If you do just don’t wear them inside your house then everything will look great!
Stuart
Yes. But my wife has better vision and so do my kids. =)
Nathan Kerxhalli
I really like doing California/blowout patches, even small ones. I find them easier to blend in than a metal patch. For the pop outs and paint knock off everything loose and unsightly, sand and reapair up w/ ready patch, plaster, etc. For your fireplace, I would bridge the gap with window and door foam, trim the excess, and repair.
Joe
You need better contractors. That door install is wrong. Screws popping after a kitchen remodel? Feel sorry for you bro. Quality patches take time, this quick fix stuff won’t hold up….I’d cut back to the studs ,add a nailer , and put a new piece of rock in like it was from scratch…tape and mud like new…problem solved right and forever…
Stuart
There are 3 of the ~5/8″ holes, one of them falling over the joist. So to put a backer, that would mean spanning 3 joists, so turning it into a 32″ patch?
Framer joe
If you have a hole over a ceiling joist ,then it’s already solid. Cut it square and screw to the joist. …but yes,there’s doing things right the first time or “Jerry rigging” stuff. The correct way takes longer and lasts forever, like the improper door install….
I only do things once and right., Hence no problems……I build custom homes, with 25 year warranties….
Pete
Alright…… your just going to have to replace your lights with some dim lights.
Frank D
I can’t leave a long detailed reply (on my phone) as some of the other commenters
– caulk, especially the common brand starting with A … blows
+ go for paintable GE silicone or GeoCell (latter is cheaper, cures faster, … )
– forget drywall mud, spackle, wood patch, …
+ small repairs, try bondo utility compound … stronger, much faster drying, sandable, can be painted within hours, etc
firefly
Very good thread. I can’t help you here since I suck at this stuff. Typically I would wait till there are enough imperfection around the house then I call one of those guy over to fix them all in one trip.
I do intent to revisit this thread at some point to follow the advises here to see to do some practice run.