This is going to be one of the most random discussions I have ever posted about here on ToolGuyd. Hopefully you’ll find it interesting, and there’s also a question or two I hope you’ll answer.
Photo Edits
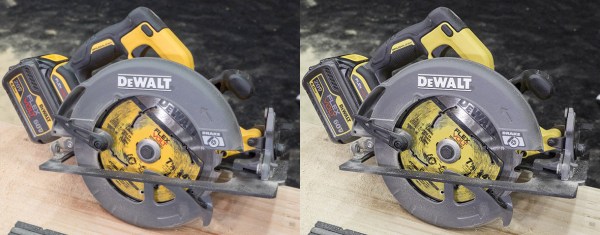
To start, I finally had a chance to update the photos in my 5 Hot New Tools from Dewalt’s 2016 Media Event post. Do you see a difference? Possibly not, so here are 2 “after and before” comparisons. The updated image is in the left or top position, the older one is in right or bottom position.
Advertisement
It’s a small but noticeable quality difference.
In trying to get that first favorite new tools post up quickly, I tried a different and quicker image processing method. But unhappy with the result, I reworked the images the way I typically do, which takes more time. Every image requires individual attention.
Straight-out-of-camera results in usable images, but often, as with the initially processed images shown here, assumptions are made as to what the image should look like. Thus, photos always require a bit of processing to look better. I’ve been shooting RAW for several years now.

Hopefully you can see the difference and appreciate the effort. To me, the difference seems to be truer-to-life colors and greater details.
Some of my media event images are used multiple times over the course of a product’s lifetime, and sometimes used in general discussion of tools and technology, and so the effort pays off.
Advertisement
You’re going to see a flood of more coverage as soon as the images are done, and the details have percolated in my mind a little bit. Ben’s too.
Media Event Coverage
We have lots of Milwaukee and Dewalt tool previews in the works. We’re trying to space it out evenly, but sometimes there might be a couple of posts in a short time.
Last year there was a comment or two about this, asking why we focused so heavily on these brands. Well, what’s the alternative?
We travelled to these events, listened to presentations, demoed tools, and asked tons of questions. It takes time to process everything and to combine our thoughts, product details, images, and other details into posts. Last year it took me into August to get all my Milwaukee NPS15 coverage up. There were bursts of coverage because I put in marathon writing sessions in those weeks.
The choice is this – huge posts that take 2 posts to write, or a dozen or two smaller and more focused posts. I feel that more focused posts are more useful, even if it means a lot of red or yellow coverage until everything is up.
Do you agree? Disagree?
How do you like our media event coverage so far?
Videos Question
This past Dewalt media event was the first time that I tried capturing video, mainly of product managers briefly introducing tools and answering questions I asked before recording began.
I’ve found these types of videos helpful in the past when I saw them on other channels. Do you? I wish I could do interview-style videos, but there’s generally a lack of time for this at media events. Interviews or Q&A videos typically also require a tripod or 2nd person.
I don’t think the videos need much before I upload them, although I might include some image overlays to hide bad zooming, focusing, or moving around technique on my part.
For future media events, what would you like to see? Sometimes it’ll just be me, other times just Ben, and on rare occasions both of us.
Upon recognizing some of the less than ideal aspects of my fieldwork, I’ll work on my technique for next time around. A handheld mic might also be a good idea.
Hardwood Choice for Drawer Fronts?
For an office or clean workshop. I’m thinking glued-up maple, maybe straight-up maple, maybe cherry. Nothing fancy, just slab drawer fronts with rounded edges. Maybe later on I’ll switch things up and try different drawer front styles.
Drawer Finishing
While we’re talking about drawers, how would you finish a plywood drawer? I know that oil-based finishes are a no-no, since the smell will linger for a long time. Maybe some de-waxed shellac and polyurethane top finish?
Sometimes Things Just Don’t Fit

This is an 80/20 15-series long L-bracket, and 80/20 flange button head cap screws. And they just don’t work together, despite 80/20’s usage recommendations.
*sigh*
I guess I’ll just use regular button head screws, or return the brackets and find a different solution.
Blum Customer Service Experience
I contacted Blum, the drawer slide company, about whether #10 fasteners will fit in their 563H series drawer slides. They recommend #6 flat head screws.
For my application, I want to use #10-32 hardware, but was worried about 1) whether the fasteners would fit the holes, and 2) whether there would be enough head clearance.
Their first response was to tell me #6 screws fit. I asked again, and they provided greater insight.
If the major diameter of the thread is .1900″ or 4.826 mm, then the screw should fit through the runner. The holes in the runner are 1/4″ or 6.1 mm in diameter. The challenge we are faced with is the head size of this screw, especially if it is a pan head. Due to its size the drawers will likely rub the screw head(s). You are more than welcome to try it on your own and let us know how it turns out. It could work depending on your drawer thickness, etc.
That’s much better guidance than their first response.
Our new kitchen drawers have Blum sides, and there looks to be plenty of head clearance for button head or low profile socket cap screw fasteners.
I guess I’ll give it the “trial and error” method. I already have a contingency for if the #10 fasteners won’t fit.
But overall, I’ve found that Blum doesn’t offer a lot of technical advice about their drawer slides. I’ve seen conflicting information what size fasteners to use on their locking devices – in different documents they recommend #6 x 1/2″ pan head screws and #6 x 5/8″ flat head screws. There’s also virtually no information about their plastic rear-mount sockets. Or any explanation why their standard locking devices are largely made from metal, and their more adjustable ones are largely made of plastic.
Porphyre
Regarding images, remember that the time you spend building an automated workflow is divided by the time saved using the workflow.
It might take you 16 hrs to get the workflow perfect, but if it saves you 2 minutes per image, the payback is only 500 images.
I agree that the higher contrast / better white balanced images look better, especially of the utility knife.
Stuart
There’s no way to get the workflow automated. Things are easier when I photograph tools in my space, because lighting is better controlled, but each image still requires different tweaks. Consider a utility knife, a wrench, a power tool, and a tool box.
Surprisingly, it’s not white balancing. In the “after” shots, I used “as-shot” WB since it looked a lot better. Maybe Photoshop reset things from the RAW images.
Before, images were cropped in Lightroom and opened in Photoshop for resizing and saving for web.
After, I did my usual, cropping, tweaking, and resizing in Lightroom for export, and then final tweaking and saving for web in Photoshop.
I tried doing everything in Lightroom in the past, but their compression for web isn’t as nice as in Photoshop. I’d think they’d do that part the same, but they don’t.
Farid
LOL. I used to obsess over images and process RAW through Lightroom and Photoshop. It takes so long that I end up years behind in sharing my photos with friends and family. I just do almost everything in Lightroom now for web usage and the difference is not that much. It was even good enough to publish in a magazine. Most people do not notice or don’t care. It funny what we obsess about and what others notice and perceive – totally different things.
Anyway, your photos are more than adequate and the baby photos are great.
OnTheWeb
Yes, you can go blind processing RAW in Silkypix, DxOptics Pro, Lightroom, Photoshop, On1, and others. The only people who will notice are photographers. 98% of the monitors out there are uncalibrated, too, with who knows what brightness, tint, etc.
That said, the photos at this site are well processed and I noticed the care taken to display quality images.
Dan
Are you sure it’s not primarily the white balance that needed to be adjusted? It sure looks like the “befores” have a green tint to them. I’m with Farid that you should focus on just doing this in Lightroom: a Develop setting (applied on import) should get you pretty close to desired results — certainly, it should ensure auto WB is set and apply a camera color profile to help get color closer, and can also apply some preferred contast, shadows, etc, that you may prefer. Then crop and export. Photoshop certainly still has its place, but unless that’s compositing or creating, Lightroom can typically handle any photo-specific needs with greater ease.
I work as a web dev but not with WordPress. I’m surprised you are doing much (if any) resizing. I would expect WP to take care of resizing and building any thumbnails you need automagically. At least, that’s one of the time-sinks I always work to remove for my clients. If I can offer insight, speak up!
BonPacific
WordPress can get really weird about resizing images, especially if you are using certain themes.
Stuart
That’s something I’ve been meaning to do – work out develop settings that are applied on import, but there are 2 types of photos that I take.
Media event photos where the lighting can be very different shot to shot. Each image really does require individual attention.
Studio photos where the lighting is very controlled and very little processing is needed aside from maybe minor exposure and contrast tweaks.
I didn’t touch the WB the first time around, but maybe PS took liberties in how it opened the photo. Or maybe it stripped away camera-applied WB correction. In the after photos, the WB was left “as shot.”
The full-res images, and that’s straight-out-of-camera jpg and not RAW-processed jpgs at low compression, are 2 orders of magnitude higher in file size than what I upload at the max width I set for the theme.
And WordPress is sometimes weird in how it resizes and compresses images. I’ve seen artifacts before.
Resizing isn’t a big deal, I have an export preset in Lightroom, an action in Photoshop.
Derek
I like the smaller more focused posts. I don’t care if it’s all red or yellow for a while. In the end all the tools get covered.
I don’t need videos from press events. Wouldn’t object to comparison videos (2 drills going head to head) or videos of unique tools being demoed.
rhyino
+1 on these points.
Nick Marques
I would highly recommend Adobe Photoshop Lightroom if you aren’t already using it. You could literally fly through edits, and it’s all non-destructive. Then, check out WP/LR Sync plugin, which can “sync” edits from Lightroom and publish right to WordPress. This is awesome because you can tweak images and they’re automatically in WP.
In Lightroom you could save processing presets for your camera and different lighting environments if they are consistent. I also can’t stress enough a good color accurate, and calibrated monitor.
Dan
Great feedback. The WP/LR Sync plugin looks slick!
Hang Fire
About that interference, wouldn’t it go away once one side was tightened down?
Is that a blind flange nut on the back of those interfering flange head screws? If so, would shortening the screw with a Dremel and grinding wheel help?
Stuart
No, it still left a gap when tightened down. The marks were where only the rims contacted the bracket. I couldn’t achieve proper engagement no matter what I tried.
The flange screws are on the inside of the L, single and double T-nuts on the other side.
Visbert
Yes, for some reason 80/20 recommends the flanged screws with brackets, but they hit the fillet on the inside. Just go with the BHCS. The flanged ones are best used on plates. I personally use BHCS for both plates and brackets. What are you building with the 80/20?
Stuart
I’ve been talking with them, and they suggested maybe the hole spacing is wrong. They’re not. So all I can think of is that maybe shape or size of the the angle extrusion curve has changed but nobody bothered to update the catalog or site recommendations.
The 80/20 will be the frame for a narrow workbench that’ll be filled with drawers.
Right now I’m debating between 3 possibilities:
Hardwood bolted to the legs to serve as drawer slide supports. The drawers would then be inset.
80/20 horizontal sides to serve as drawer slide supports. This would require more hardware than I’d like.
Lengthening everything by 1″ and using Blum rear mount brackets, but the drawers would then stick out. This would be the neatest way to do things. Right now, the internal frame is 1″ too short to use the rear mount brackets. It’s 18″ deep.
Visbert
I’ve been using 80/20 for over 15 years, and the FBHSCS didn’t work back then either. It’s much better to use end connectors or anchor fasteners to connect the pieces together. If you don’t have a milling machine, it’s pretty tough to do the counterbores yourself, but 80/20 can do all kinds of machining. I just order the bars cut to length and with the appropriate machining. Have you ever tried this?
Stuart
I do have some anchor fasteners. My drill press is off-site and I don’t have a large enough mill to accommodate the needed 13/16″ counterbore and its 5/8″ shank.
80/20 charges $2.60 per anchor counterbore.
Since a single anchor might be light when used in certain orientations, I would want to use a double anchor, which would raise the machining charge to over $10 per piece.
For a workbench structure, I prefer the use of gusseted angle pieces, but I’ll try anchors in some places. Maybe the next build, or for the front pieces of my cabinet.
Graham Howe
Regarding plywood drawer finishing, unless you are going with any colouring, stain, polyshades etc where you want to prevent blotching, I would skip the shellac and go straight to water based poly for shop cabinets/drawers. It is cheap, easy to apply and good for sweeping dust off etc. There’s nothing wrong with shellac, especially the dewaxed stuff, under poly, I just don’t think it’s necessary for shop furniture.
BikerDad
Another vote for “smaller, more focused”.
As far as the photo tweaking goes, I do like and see the color improvement, don’t really see any differences in the detail.
julian
For strictly web based content as these pics are, why bother shooting raw? Seems like an unnecessary burden and time-adder. Most camera’s ooc jpegs are very good these days and a lot of easier to immediately put to use without any fiddling others than cropping.
And what camera are you shooting that gives you such out of true colors to begin with? I’ll agree that sometimes AWB doesn’t do the trick, but any decent camera these days will offer a custom white balance option and some with a one-touch button setting to set a temp custom white balance, so it’s a quick fix to set your white balance to some odd lighting with a shot of some white paper.
I only shoot raw when I have an image that has a large dynamic range and may need to be underexposed to keep the highlights and pull the shadows up in the raw processing…
JT
Stuart
Back when I had the time to do such things, I did A vs. B testing and found that I could push images a bit more in RAW, and even when I didn’t they looked slightly better.
Media event images are often shot at high ISO, and the noise reduction has been better for me off-camera than on.
It became a habit, and honestly RAW processing isn’t much more involved than working with jpgs.
Kurt
Maybe not applicable for your project, but if you have a Habitat for Humanity ReStore nearby, I found them excellent source for odds and ends of laminate flooring. Great prefinished pieces of wood that make excellent workbench tops, or decorative additions to other projects when you trim out the edges. If I was building a workbench with cabinets and wanted to dress it up, I would use them, as the cost is usually $ 1 a SF or even less.
Scott
I’d suggest shooting with a flash and diffuser, mounted on a bracket to the side of the camera (the bracket is an easy DIY). This will normalize the light temperature to something the camera is more familiar with. And, to take it a step further, get a gray card and white balance off of that for each shooting condition (along with the flash). Your in-camera JPGs will come out with accurate color rendering, and you leverage all of the proprietary in-camera demosaicing, noise reduction, and sharpening (which is almost always better than a 3rd party post-processing software).
Stuart
I stopped taking flashes to media events. It’s just more stuff to carry around, and with variable environments it requires too much effort for marginal improvement in lighting.
I don’t bother with manual WB settings when taking field photos either, since the color temperature often changes with the lighting. There was a time when I did, and it saved me a little bit of processing time while costing me a bit of scarcer on-site time.
Robbie stanford
Smaller more focused posts, when you edit your pictures, do it in batches any group of pictures taken under the same conditions will accept the same edits, if you use 10 pictures from a booth at a trade show edit 1 photo then apply that edit to all 10 of those pictures. When you export from Lightroom you can turn off or add sharpening, I’ve found that Lightroom is better at those tasks than photoshop. Lightroom will publish to web services automatically.
Stuart
Thanks, I’ll consider that!
Doug
I like spraying drawer boxes with lacquer. Either water or solvent based, cheap spray can or fancy setup, it hardly matters. It dries quickly, builds quickly, and is plenty durable for most uses.
Keep covering Red and Yellow as you have been. Too bad Makita, Bosch, Metabo, et al. seem content to fight for a distant third place.
Yadda
I agree with you Stuart. Focused = better. Keep up the good work!
glenn
As with most above comments I agree smaller more focused posts are the go.
Photo editing? On my laptop the original images look better, the edited ones look washed out.
Personally I don’t bother watching videos on tools, most of the ones I have seen are too much waffling, babbling etc and are too slow getting to the point with an actual demo.
The bracket? Put one screw all the way in first.
Either way It is and always will be a great site!
Diplomatic Immunity
Ah I was wondering if Dewalt had suddenly changed their color scheme a bit. Lol this explains it. As for media coverage I just like a small pic, tool specs, and hopefully every tool listed with details on how they work. I don’t need videos. As always keep up the good work!
Tj
Until Bosch and Makita have something worth showing off, there’s not much point in bitching about all the Red and Yellow coverage. Haters gonna hate, I guess.
I’d prefer more individual articles. You guys do great work, but at the end of the day, websites are entertainment/reasons to slack off at work for 5 minutes at a time. More is better 🙂